About Me

My photo
Hi Friends, I am Sandeep CC and some people know me as System Administrator. I have started my professional career from 2008. I have been working as System Administrator on Linux Server and Windows Client. I am here to share my Knowledge in which I have experienced and which I have come across till now, It could be help to you people. In case anything wrong or any improvements in my post steps, Please comment to the post, Feel free to contact me by posting comments on this blog. Thanks and Regards, Sandeep CC

Tuesday, October 16, 2012

CONFIGURE ROUTER ON REDHAT LINUX-5/6 (SHOREWALL)

Shorewall Configuration On Redhat-5/6

Requirements:
1. Public Network
2. LAN Network
3. Linux Server (Required 3 NIC PORT)

4. Shorewall Package (Download Latest Shorewall Package and Install)

Here My Office Concepts:

I have configured Router by using Shorewall 3rd Party Tools,

Example:
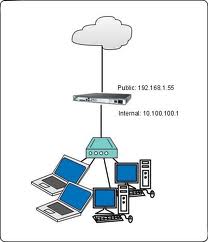
ISP: 10.10.10.10 (Public)
LAN1: 172.16.4.1 - 172.16.4.254

LAN2: 192.168.4.1 - 192.168.4.10 (Public)

Scenario:
From ISP we have got one lease line (10.10.10.10) with 10 IP's Free, if we route to main lease IP then only we can use remaining 10 IP's as public IP anywhere in network, So here total now becanme 3 Network's 1. Main Public Network 2. Depended Public Network 3. Local Area Network, This 3 network also need to access ping each other network...

===================================================================

Installation:
[root@router home]# rpm -ivh shorewall-4.4.7-1.noarch.rpm
Preparing...                ########################################### [100%]
   1:shorewall              ########################################### [100%]
[root@router home]#

Sysctl.conf File Modification: IP Forwarding
[root@router etc]# cp sysctl.conf sysctl.conf.org
[root@router etc]# vi sysctl.conf
# Controls IP packet forwarding
net.ipv4.ip_forward = 1
(default it was 0 make it 1)

Basic Network & IP OF NETWORKS:
1. Public: 10.10.10.10 net eth0
2. Public + Private: 192.168.4.1 dmz eth2
3. Local: 172.16.4.1 loc eth1

Host Name
[root@router ~]# cat /etc/sysconfig/network
NETWORKING=yes
NETWORKING_IPV6=yes
HOSTNAME=edurouter.xyz.com

Put ISP DNS in resolv.conf file[root@router ~]# cat /etc/resolv.conf
; generated by /sbin/dhclient-script
#search localdomain
nameserver IPS DNS IP

[root@router ~]#
Setup IP
[root@router ~]# ifconfig
eth0      Link encap:Ethernet  HWaddr XX:XX:XX:XX:XX
          inet addr:10.10.10.10  Bcast:xx.xx.xx.xx  Mask:255.255.255.0
          inet6 addr: fa80::x11:58ff:feyc:5fa7/64 Scope:Link
          UP BROADCAST RUNNING MULTICAST  MTU:1500  Metric:1
          RX packets:111447029 errors:0 dropped:0 overruns:0 frame:0
          TX packets:99925403 errors:0 dropped:0 overruns:0 carrier:0
          collisions:573853 txqueuelen:1000
          RX bytes:4184601542 (3.8 GiB)  TX bytes:1685430657 (1.5 GiB)
          Interrupt:193 Base address:0x2400

eth1      Link encap:Ethernet  HWaddr XX:XX:XX:XX:XX 
          inet addr:172.16.4.1  Bcast:172.16.4.255  Mask:255.255.255.0
          inet6 addr: fe81::2z0:9llff:fe14322:7979/64 Scope:Link
          UP BROADCAST RUNNING MULTICAST  MTU:1500  Metric:1
          RX packets:3227980 errors:0 dropped:0 overruns:0 frame:0
          TX packets:17165972 errors:0 dropped:0 overruns:0 carrier:0
          collisions:0 txqueuelen:100
          RX bytes:323716456 (308.7 MiB)  TX bytes:669689826 (638.6 MiB)
          Base address:0xecc0 Memory:fe100000-fe120000

eth2      Link encap:Ethernet  HWaddr XX:XX:XX:XX:XX 
          inet addr:192.168.4.1  Bcast:192.168.4.255  Mask:255.255.255.0
          inet6 addr: f3e80::2a1fg0:7bff:fe4bs:b47/64 Scope:Link
          UP BROADCAST RUNNING MULTICAST  MTU:1500  Metric:1
          RX packets:106119080 errors:0 dropped:0 overruns:0 frame:0
          TX packets:94155429 errors:0 dropped:0 overruns:0 carrier:0
          collisions:0 txqueuelen:1000
          RX bytes:2329561954 (2.1 GiB)  TX bytes:3487500317 (3.2 GiB)
          Interrupt:201 Base address:0x4000

lo        Link encap:Local Loopback 
          inet addr:127.0.0.1  Mask:255.0.0.0
          inet6 addr: ::1/128 Scope:Host
          UP LOOPBACK RUNNING  MTU:16436  Metric:1
          RX packets:2934 errors:0 dropped:0 overruns:0 frame:0
          TX packets:2934 errors:0 dropped:0 overruns:0 carrier:0
          collisions:0 txqueuelen:0
          RX bytes:11665575 (11.1 MiB)  TX bytes:11665575 (11.1 MiB)

[root@router ~]#


Configuration of Shorewall files: (Before modifiying take original file backup for your safety purpose)

Zone File (Introduce your Zone with IP Version)
[root@router etc]# cd /etc/shorewall[root@router shorewall]# cp zones zones.org
[root@router shorewall]# vi zones

###############################################################################
#ZONE    TYPE        OPTIONS        IN            OUT
#                    OPTIONS            OPTIONS
fw    firewall
net    ipv4
loc    ipv4
dmz    ipv4
[root@router shorewall]#

==========================================================================================================================
interfaces Interfaces File (Introduce your zones to Ethernet)
[root@router shorewall]# cp interfaces interfaces.org
[root@router shorewall]# vi interfaces

###############################################################################
#ZONE   INTERFACE       BROADCAST       OPTIONS
net     eth3    detect  routeback
loc     eth1    detect  tcpflags,routeback
net     eth2    detect  tcpflags,routeback
~                                                  

===========================================================================================================================
Policy File (Give Permissions to zones to accepts each other)
[root@router shorewall]# cp policy policy.org
[root@router shorewall]# vi policy


loc     dmz     ACCEPT
loc     fw      ACCEPT
fw      loc     ACCEPT
fw      dmz     ACCEPT
#dmz    loc     ACCEPT
# If you want open access to the Internet from your Firewall
# remove the comment from the following line.
fw              net             ACCEPT
net             all             DROP            info
# THE FOLLOWING POLICY MUST BE LAST
all             all             REJECT          info

============================================================================================================================
Masq
[root@router shorewall]# cp masq masq.org
[root@router shorewall]# vi masq

###############################################################################
#INTERFACE              SOURCE          ADDRESS         PROTO   PORT(S) IPSEC   MARK    USER/
#                                                                                       GROUP
eth3                    eth1
eth2                    eth1

==============================================================================================================================
Rules (Give your own company rules, open port for your required services)
[root@router shorewall]# cp rules rules.org
[root@router shorewall]# vi rules

#       Accept DNS connections from the firewall to the Internet
#
ACCEPT          fw              net             tcp     53
ACCEPT          fw              net             udp     53
#
#
#       Accept SSH connections from the local network to the firewall and DMZ
#
ACCEPT          loc             fw              tcp     22
ACCEPT          loc             dmz             tcp     22
#
#       DMZ DNS access to the Internet
#
ACCEPT          dmz             net             tcp     53
ACCEPT          dmz             net             udp     53

ACCEPT          loc             net             tcp     53
ACCEPT          loc             net             udp     53

ACCEPT          loc             fw              tcp     53
ACCEPT          loc             fw              udp     53

ACCEPT          dmz             fw              tcp     53
ACCEPT          dmz             fw              udp     53

ACCEPT          loc             net             udp     123
ACCEPT          loc             fw              udp     4242 # Ntop
#
#       Make ping work bi-directionally between the dmz, net, Firewall and local zone
#       (assumes that the loc-> net policy is ACCEPT).
#
ACCEPT          net             fw              icmp    8
ACCEPT          loc             fw              icmp    8
ACCEPT          dmz             fw              icmp    8
ACCEPT          loc             dmz             icmp    8
#
#ACCEPT         vpn             dmz             icmp    8
#ACCEPT         dmz             vpn             icmp    8
#
ACCEPT          dmz             loc             icmp    8
ACCEPT          dmz             net             icmp    8
ACCEPT          fw              net             icmp
ACCEPT          fw              loc             icmp
ACCEPT          fw              dmz             icmp
ACCEPT          net             dmz             icmp    8       # Only with Proxy ARP and
ACCEPT          net             loc             icmp    8       # static NAT
ACCEPT          loc             net             icmp

# additional rules (Router: July 14, 2012)
ACCEPT          loc                     net             tcp
#
#       DMZ to net access rules
#
ACCEPT          loc                     fw              tcp
#
# remote Desktop
ACCEPT        fw        net        tcp    3389
ACCEPT        net        loc        tcp    3389
ACCEPT        net        dmz        tcp    3389
ACCEPT        loc        dmz        tcp    3389
ACCEPT        dmz        loc        tcp    3389

#FTP
ACCEPT        net        fw        tcp    21
ACCEPT        net        fw        udp    21
ACCEPT          net             fw              tcp     20
ACCEPT          net             fw              udp     20
ACCEPT        net        loc        tcp    21
ACCEPT          net             loc             udp     21
ACCEPT          net             loc             tcp     20
ACCEPT          net             loc             udp     20

======================================================================================================================================
Shorewall.conf file (Check your config file should like below)
[root@router shorewall]# cp shorewall.conf shorewall.conf.org
[root@router shorewall]# vi shorewall.conf

#                      S T A R T U P   E N A B L E D
###############################################################################
STARTUP_ENABLED=Yes ------------------------> Default is no, make it yes
###############################################################################
#                             V E R B O S I T Y
###############################################################################
VERBOSITY=0 -------------------------------------> Default is 1, make it 0
###############################################################################
#                              L O G G I N G
###############################################################################
LOGFILE=/var/log/messages
STARTUP_LOG=/var/log/shorewall-init.log
LOG_VERBOSITY=1 ------------------------> Default is 2, Make it 1
LOGFORMAT="Shorewall:%s:%s:"
LOGTAGONLY=No
LOGRATE=
LOGBURST=
LOGALLNEW=
BLACKLIST_LOGLEVEL=
MACLIST_LOG_LEVEL=info
TCP_FLAGS_LOG_LEVEL=info
SMURF_LOG_LEVEL=info
LOG_MARTIANS=No ----------------------------> Default is Yes, Make it No
======================================================================================================================================
Keep Always On Shorewall Service:
[root@router shorewall]# chkconfig shorewall --levels 235 on
[root@router shorewall]#

Start Shorewall Service:
[root@router shorewall]# service shorewall start
Starting shorewall:                          [  OK  ] [root@router shorewall]#

Now try to ping each other from all 3 networks....

Thanks and Regards,
Sandeep CC

Friday, September 28, 2012

SQUIRRELMAIL WITH SENDMAIL AND DOVECOT on REDHAT LINUX

SQUIRRELMAIL + SENDMAIL + DOVECOT + APACHE on Redhat Linux


* HOW TO ACCESS MAILS IN BROWSER
* HOW TO ACCESS SENDMAIL/DOVECOT MAILS IN BROWSER

Hi friends many of knows how to configure mail server in linux, but they will struck with opening mails in browser, Here we have solution for that....

For Installation & Configuration of Sendmail & Dovecot Visit Last Post Click Here


Note: Before Installing Squirrelmail we need to install php

1. php (Available in RHEL DVD PACK)
2. php-cli (Available in RHEL DVD PACK)
3. php-common (Available in RHEL DVD PACK)
4. libgmp.so.3 (For download Click Here

Installation of php & dependence

[root@  DATA]# rpm -ivh libgmp3-4.1.2-4sls.i586.rpm
warning: libgmp3-4.1.2-4sls.i586.rpm: Header V3 DSA signature: NOKEY, key ID 67f22696
Preparing...                ########################################### [100%]
   1:libgmp3                ########################################### [100%]
[root@  DATA]#

[root@  Server]# rpm -ivh php-cli-5.1.6-23.el5.i386.rpm
warning: php-cli-5.1.6-23.el5.i386.rpm: Header V3 DSA signature: NOKEY, key ID 37017186
Preparing...                ########################################### [100%]
   1:php-cli                ########################################### [100%]
[root@  Server]#

[root@  Server]# rpm -ivh php-common-5.1.6-23.el5.i386.rpm
warning: php-common-5.1.6-23.el5.i386.rpm: Header V3 DSA signature: NOKEY, key ID 37017186
Preparing...                ########################################### [100%]
   1:php-common             ########################################### [100%]
[root@  Server]#

Installation of SquirrelMail 1.4.6 (To Download Squirellmail Click Here)

[root@  DATA]# rpm -ivh squirrelmail-1.4.6-1.noarch.rpm
warning: squirrelmail-1.4.6-1.noarch.rpm: Header V3 DSA signature: NOKEY, key ID 1eb393ea
Preparing...                ########################################### [100%]
   1:squirrelmail           ########################################### [100%]
[root@  DATA]#

Check Squirrelmail rpm has installed properly

[root@  DATA]# rpm -qa |grep squirrelmail
squirrelmail-1.4.6-1
[root@  DATA]#

Go to /usr/share/squirrelmail directory

[root@  squirrelmail]# ls -ltr
total 44
-rw-r--r--  1 root root  684 Feb 27  2006 index.php
drwxr-xr-x  3 root root 4096 Sep 27 15:00 themes
drwxr-xr-x  2 root root 4096 Sep 27 15:00 src
drwxr-xr-x 18 root root 4096 Sep 27 15:00 plugins
drwxr-xr-x  2 root root 4096 Sep 27 15:00 locale
drwxr-xr-x  3 root root 4096 Sep 27 15:00 include
drwxr-xr-x  2 root root 4096 Sep 27 15:00 images
drwxr-xr-x  3 root root 4096 Sep 27 15:00 help
drwxr-xr-x  4 root root 4096 Sep 27 15:00 functions
drwxr-xr-x  2 root root 4096 Sep 27 15:00 config
drwxr-xr-x  5 root root 4096 Sep 27 15:00 class
[root@  squirrelmail]#


Go to config directory

[root@  squirrelmail]# cd config/
[root@  config]# ls -ltr
total 176
-rw-r--r-- 1 root root    492 Feb 27  2006 index.php
-rwxr-xr-x 1 root root 139402 Feb 27  2006 conf.pl
-rw-r--r-- 1 root root  26911 Feb 27  2006 config_default.php
lrwxrwxrwx 1 root root     28 Sep 27 15:00 config.php -> /etc/squirrelmail/config.php
lrwxrwxrwx 1 root root     34 Sep 27 15:00 config_local.php -> /etc/squirrelmail/config_local.php
[root@  config]#

Run conf.pl file

[root@ config]# ./conf.pl
SquirrelMail Configuration : Read: config.php (1.4.0)
---------------------------------------------------------
Main Menu --
1.  Organization Preferences
2.  Server Settings
3.  Folder Defaults
4.  General Options
5.  Themes
6.  Address Books
7.  Message of the Day (MOTD)
8.  Plugins
9.  Database
10. Languages

D.  Set pre-defined settings for specific IMAP servers

C   Turn color on
S   Save data
Q   Quit

Command >>


NOTE: This not a normal modify with vi editor, Just we need to select option like 1,2 or A,B etc...

In about default page we are not seeing anything front of Main Menu option 1 2 3, Actually everything is there front of that option but it has hidden with colors, to check just select something u will get written some words, For your make easy purpose Press C and Enter, now you its visible everything,

Few Commands to modify this file

To Choose options Press 1 2 3 OR AB etc...(your choice to go particular option) & Press Enter...
  
Type 1 Press Enter

Organization Preferences
1.  Organization Name      : XYZ-Company-Name
2.  Organization Logo      : ../images/sm_logo.png
3.  Org. Logo Width/Height : (308/111)
4.  Organization Title     : xyz_domain webmail
5.  Signout Page           :
6.  Top Frame              : _top
7.  Provider link          : http://xyz.com OR http://192.168.4.1
8.  Provider name          : company

Type S Press Enter
Type R Press Enter

Type 2 Press Enter
Server Settings

General
-------
1.  Domain                 : xyz.com
2.  Invert Time            : false
3.  Sendmail or SMTP       : Sendmail

A.  Update IMAP Settings   : localhost:143 (uw)
B.  Change Sendmail Config : /usr/sbin/sendmail

Press A to update imap

IMAP Settings
--------------
4.  IMAP Server            : localhost
5.  IMAP Port              : 143
6.  Authentication type    : login
7.  Secure IMAP (TLS)      : false
8.  Server software        : uw
9.  Delimiter              : /

Type S Press Enter
Type R Press Enter

Press 3 Enter

Folder Defaults
1.  Default Folder Prefix         : mail/
2.  Show Folder Prefix Option     : true
3.  Trash Folder                  : Trash
4.  Sent Folder                   : Sent
5.  Drafts Folder                 : Drafts
6.  By default, move to trash     : true
7.  By default, move to sent      : true
8.  By default, save as draft     : true
9.  List Special Folders First    : true
10. Show Special Folders Color    : true
11. Auto Expunge                  : true
12. Default Sub. of INBOX         : false
13. Show 'Contain Sub.' Option    : true
14. Default Unseen Notify         : 2
15. Default Unseen Type           : 1
16. Auto Create Special Folders   : true
17. Folder Delete Bypasses Trash  : false
18. Enable /NoSelect folder fix   : false

Type S Press Enter
Type R Press Enter

Press 4 Enter

General Options
1.  Data Directory              : /var/lib/squirrelmail/prefs/
2.  Attachment Directory        : /var/spool/squirrelmail/attach/
3.  Directory Hash Level        : 0
4.  Default Left Size           : 150
5.  Usernames in Lowercase      : false
6.  Allow use of priority       : true
7.  Hide SM attributions        : false
8.  Allow use of receipts       : true
9.  Allow editing of identity   : true
    Allow editing of name       : true
    Remove username from header : false
10. Allow server thread sort    : true
11. Allow server-side sorting   : true
12. Allow server charset search : true
13. Enable UID support          : true
14. PHP session name            : SQMSESSID

Type S Press Enter
Type R Press Enter

Press 8 Enter

Plugins
  Installed Plugins
    1. delete_move_next
    2. newmail
    3. info
    4. calendar
    5. filters
    6. mail_fetch
    7. message_details
    8. spamcop
    9. sent_subfolders
    10. abook_take
    11. squirrelspell

  Available Plugins:
    12. listcommands
    13. translate
    14. bug_report
    15. administrator
    16. fortune

Press any no which you like to keep plugins

Finally Save and Quit

Now open browser and check

http://192.168.4.1/webmail

OR

http://xyz.com/webmail

Note: If you get any error then check with your iptables/firewall & and allow 80 & 143 port and then check with browser,

You will get below image Give username and password (which created for mail access)

Now you can access mail anywhere from browser, also you can access mails in outlook...


Thanks and Regards,
Sandeep CC

Tuesday, August 14, 2012

Configuration Mail Server On REDHAT LINUX-5

MAIL SERVER WITH REDHAT LINUX AND WINDOWS CLIENTS:


Server Setup:


Server: freedom-web.sandeepc.com
Domain Name: sandeepc.com
Server IP: 192.168.1.1
Client: Linux and Windows XP/2003

Requirement PACKAGE AND SERVICES:

1. PACKAGE:

DOVECOT (For Incoming Mail)
Sendmail (For Outgoing Mail)

2. SERVICES:

DNS (named) service (Click here to check Installation steps of DNS SERVER)
APACHE (httpd) service (This is optional service)(Click here to check Installation steps of APACHE/WEBSERVER)


INSTALL DOVECOT RPM FOR INCOMING MAILS

[root@freedom-web Server]# rpm -i dovecot-1.0-1.2.rc15.el5.i386.rpm
warning: dovecot-1.0-1.2.rc15.el5.i386.rpm: Header V3 DSA signature: NOKEY, key ID 37017186
[root@freedom-web Server]#

[root@freedom-web Server]# cd /etc/
[root@freedom-web etc]# ls -ltr |grep dov
-rw-r--r-- 1 root root 39849 Dec 22 2006 dovecot.conf
[root@freedom-web etc]# cp dovecot.conf dovecot.conf.org
[root@freedom-web etc]# vi dovecot.conf

(Line No 17 Remove "#")
protocols = imap imaps pop3 pop3s

INSTALL SENDMAIL & SENDMAIL.CF FOR OUTGOING MAILS

[root@freedom-web etc]# rpm -qa |grep sendmail
sendmail-8.13.8-2.el5
[root@freedom-web etc]#

[root@freedom-web Server]# rpm -i sendmail-cf-8.13.8-2.el5.i386.rpm
warning: sendmail-cf-8.13.8-2.el5.i386.rpm: Header V3 DSA signature: NOKEY, key ID 37017186
[root@freedom-web Server]#

[root@freedom-web mail]# cd /etc/mail
[root@freedom-web mail]# vi sendmail.mc

(#####Line no 116 look like this#####)
dnl DAEMON_OPTIONS(`Port=smtp,Addr=127.0.0.1, Name=MTA')dnl

(#####Line no 155 look like this#####)

dnl LOCAL_DOMAIN(`localhost.localdomain')dnl
#dnl LOCAL_DOMAIN(`sandeepc.com')dnl

[root@freedom-web mail]# m4 sendmail.mc > sendmail.cf
[root@freedom-web mail]#

[root@freedom-web mail]# vi access
# Check the /usr/share/doc/sendmail/README.cf file for a description
# of the format of this file. (search for access_db in that file)
# The /usr/share/doc/sendmail/README.cf is part of the sendmail-doc
# package.
#
# by default we allow relaying from localhost...
Connect:localhost.localdomain RELAY
Connect:localhost RELAY
Connect:127.0.0.1 RELAY
#sandeepc.com RELAY
connect station: sandeepc.com ----> add this line
connect: sandeepc.com -----> add this line
connect: 192.168.1.1 -----> add this line

:wq save and exit

[root@freedom-web mail]# make
make: Nothing to be done for `all'.
[root@freedom-web mail]#

DNS CONFIGURATION FOR FQDN

[root@freedom-web mail]# cd /var/named/chroot/var/named/
[root@freedom-web named]#

[root@freedom-web named]# vi sandeepc.com.zone
$TTL 86400
@ SOA sandeepc.com. root(
42 ; serial
3H ; refresh
15M ; retry
1W ; expiry
1D ) ; minimum

sandeepc.com MX 10 mail ;primary mail exchanger -----> add this line
@ NS freedom-web.sandeepc.com.
@ NS client1.client.com.
freedom-web A 192.168.1.1
mail A 192.168.1.1 ----------> add this line


:wq & Save Exit

Note: Finally Restart dovecot & sendmail service (After modifying anything in config file restart the both service once)

Client Setup With Windows:


I have tried mail server with windows client,Configured client in XP & Win-2k3 with outlook express...
STEP-1


STEP-2


STEP-3


STEP-4


STEP-5

Now User have added to Outlook Express, now try to synchronize, if get any problem with synchronize, check with user and pass, check with firewall in server and client too, if iptables is on then enable port no 53 for tcp & utp. then again try to synchronize...


Thanks and Regards,
Sandeep CC

Friday, August 10, 2012

Configure DNS Server Redhat Linux - 5

CONFIGURE DNS (DOMAIN NAMING SERVER) ON REDHAT LINUX - 5

Setup:
Server : RHEL-5
Localhost Name: freedom-web
Domain Name: sandeepc.com
Server IP: 192.168.4.1

Client: Windows-2003, XP & Linux

Requirment: This bind & caching-nameserver packages available on RHEL-5 DVD only...

Installation of Packages:

THESE PACKAGES INSTALLED DEFAULT
[root@FREEDOM-WEB Server]# rpm -qa |grep bind
bind-libs-9.3.3-7.el5
bind-utils-9.3.3-7.el5
ypbind-1.19-7.el5
[root@FREEDOM-WEB Server]#

NEED TO INSTALL THESE PACKAGES
[root@FREEDOM-WEB Server]# rpm -i bind-9.3.3-7.el5.i386.rpm
warning: bind-9.3.3-7.el5.i386.rpm: Header V3 DSA signature: NOKEY, key ID 37017186
[root@FREEDOM-WEB Server]#

[root@FREEDOM-WEB Server]# rpm -i bind-devel-9.3.3-7.el5.i386.rpm
warning: bind-devel-9.3.3-7.el5.i386.rpm: Header V3 DSA signature: NOKEY, key ID 37017186
[root@FREEDOM-WEB Server]#

[root@FREEDOM-WEB Server]# rpm -i bind-libbind-devel-9.3.3-7.el5.i386.rpm
warning: bind-libbind-devel-9.3.3-7.el5.i386.rpm: Header V3 DSA signature: NOKEY, key ID 37017186
[root@FREEDOM-WEB Server]#

[root@FREEDOM-WEB Server]# rpm -i bind-sdb-9.3.3-7.el5.i386.rpm
warning: bind-sdb-9.3.3-7.el5.i386.rpm: Header V3 DSA signature: NOKEY, key ID 37017186
[root@FREEDOM-WEB Server]#

[root@FREEDOM-WEB Server]# rpm -i caching-nameserver-9.3.3-7.el5.i386.rpm
warning: caching-nameserver-9.3.3-7.el5.i386.rpm: Header V3 DSA signature: NOKEY, key ID 37017186
[root@FREEDOM-WEB Server]#

[root@FREEDOM-WEB Server]# rpm -i cachefilesd-0.7-6.el5.i386.rpm
warning: cachefilesd-0.7-6.el5.i386.rpm: Header V3 DSA signature: NOKEY, key ID 37017186
[root@FREEDOM-WEB Server]#

[root@FREEDOM-WEB Server]# rpm -i bind-chroot-9.3.3-7.el5.i386.rpm
warning: bind-chroot-9.3.3-7.el5.i386.rpm: Header V3 DSA signature: NOKEY, key ID 37017186
[root@FREEDOM-WEB Server]#

CHECK BELOW PACKAGES INSTALLED PROPERLY
[root@FREEDOM-WEB Server]# rpm -qa |grep bind
bind-libs-9.3.3-7.el5
bind-9.3.3-7.el5
bind-chroot-9.3.3-7.el5
bind-utils-9.3.3-7.el5
bind-devel-9.3.3-7.el5
bind-sdb-9.3.3-7.el5
ypbind-1.19-7.el5
bind-libbind-devel-9.3.3-7.el5
[root@FREEDOM-WEB Server]#

[root@FREEDOM-WEB Server]# rpm -qa |grep caching
caching-nameserver-9.3.3-7.el5
[root@FREEDOM-WEB Server]# rpm -qa |grep cachefilesd
cachefilesd-0.7-6.el5
[root@FREEDOM-WEB Server]#


Set hostname to freedom-web.sandeepc.com and ip address to 192.168.1.1

[root@FREEDOM-WEB ~]# cat /etc/sysconfig/network
NETWORKING=yes
NETWORKING_IPV6=yes
HOSTNAME=freedom-web.sandeepc.com
[root@FREEDOM-WEB ~]#

[root@FREEDOM-WEB ~]# ifconfig eth0
eth0 Link encap:Ethernet HWaddr 00:0C:29:C1:C7:31
inet addr:192.168.1.1 Bcast:192.168.1.1 Mask:255.255.255.255
inet6 addr: fe80::20c:29ff:fec1:c731/64 Scope:Link
UP BROADCAST RUNNING MULTICAST MTU:1500 Metric:1
RX packets:117021 errors:0 dropped:0 overruns:0 frame:0
TX packets:28367 errors:0 dropped:0 overruns:0 carrier:0
collisions:0 txqueuelen:1000
RX bytes:49770336 (47.4 MiB) TX bytes:4354972 (4.1 MiB)
Interrupt:67 Base address:0x2024
[root@FREEDOM-WEB ~]#

Add DNS IP in resolv.conf file (server IP)
[root@FREEDOM-WEB ~]# cat /etc/resolv.conf
# Generated by NetworkManager
search com
nameserver 192.168.4.1
[root@FREEDOM-WEB~]#

Modify with hosts file (do not remove localhost line, add server ip and name) (This is main for mail server)
[root@educloudsvr ~]# cat /etc/hosts
127.0.0.1       localhost.localdomain   localhost.localdomain   localhost4      localhost4.localdomain4 localhost
::1     localhost.localdomain   localhost.localdomain   localhost6      localhost6.localdomain6 localhost
192.168.4.1     freedom-web.sandeepc.com        mail
[root@educloudsvr ~]#

By Default should create below files, if not created then create manualy named.conf file and enter as it is how given below things:

[root@FREEDOM-WEB etc]# cd /var/named/chroot/etc
[root@FREEDOM-WEB etc]# ls -ltr
total 40
-rw-r----- 1 root named 955 Jan 16 2007 named.rfc1912.zones
-rw-r----- 1 root named 1100 Jan 16 2007 named.caching-nameserver.conf
-rw-r--r-- 1 root root 1017 Jul 17 09:52 localtime
-rw-r--r-- 1 root named 113 Aug 9 02:40 rndc.key
-rw-r--r-- 1 root named 225 Aug 9 03:05 named.conf
[root@FREEDOM-WEB etc]#
===========================================================================================================
NOTE:::If not created named.conf file then only need to follow this step
[root@FREEDOM-WEB etc]# vi named.conf
options{
directory "/var/named/";
};

zone "sandeepc.com" {
type master;
file "sandeepc.com.zone";
allow-transfer {192.168.1.254;};
};
zone "1.168.192.in-addr.arpa" {
type master;
file "1.168.192.in-addr.arpa.zone";
};
[root@FREEDOM-WEB etc]#
========================================================================================================================================

CONFIGURE ZONE FILE

Here shown two zone files FORWARD & REVERSE ZONE FILES sandeepc.com.zone for forward zone and 1.168.192.in-addr.arpa for reverse zone. These files will be store be default in /var/named/chroot/var/named/ location. We will use two sample files for creating these files.

Change directory to /var/named/chroot/var/named and copy the sample files to name which we have set in named.conf

[root@FREEDOM-WEB etc]# cd /var/named/chroot/var/named/
[root@FREEDOM-WEB named]#

FORWARD ZONE CREATION
[root@FREEDOM-WEB named]# cp localhost.zone sandeepc.com.zone
[root@FREEDOM-WEB named]#

REVERSE ZONE CREATION
[root@FREEDOM-WEB named]# cp named.local 1.168.192.in-addr.arpa.zone
[root@FREEDOM-WEB named]#

Now open forward zone file sandeepc.com.zone
####By default this file will look like this###
[root@FREEDOM-WEB named]# vi sandeepc.com.zone

$TTL 86400
@ IN SOA @ root(
42 ; serial
3H ; refresh
15M ; retry
1W ; expiry
1D ) ; minimum
IN NS @
IN A 127.0.0.1
IN AAAA ::1
~
###########################################################################################################

#####Change this file as per requirement as shown in below zone file####

[root@FREEDOM-WEB named]# vi sandeepc.com.zone
$TTL 86400
@ SOA sandeepc.com. root(
42 ; serial
3H ; refresh
15M ; retry
1W ; expiry
1D ) ; minimum
sandeepc.com MX 10 mail ;primary mail exchanger -----> This is for Mail Server
@ NS freedom-web.sandeepc.com.
@ NS client1.client.com.
freedom-web A 192.168.1.1
client1 A 192.168.1.2
client2 A 192.168.1.3
mail A 192.168.1.1 ----------> This is for Mail Server

:wq save and exit
###########################################################################################################

Now open reverse lookup zone file 1.168.192.in-addr.arpa
[root@FREEDOM-WEB named]# vi 1.168.192.in-addr.arpa.zone

####By default this file will look like this###

$TTL 86400
@ IN SOA localhost. root.localhost. (
1997022700 ; Serial
28800 ; Refresh
14400 ; Retry
3600000 ; Expire
86400 ) ; Minimum
IN NS localhost.
1 IN PTR localhost.

###########################################################################################################

#####Change this file as per requirement as shown in below zone file####

[root@FREEDOM-WEB named]# vi 1.168.192.in-addr.arpa.zone
$TTL 86400
@ SOA sandeepc.com root.freedom-web.sandeepc.com. (
1997022700 ; Serial
28800 ; Refresh
14400 ; Retry
3600000 ; Expire
86400 ) ; Minimum
IN NS freedom-web.sandeepc.com
1 IN PTR freedom-web.sandeepc.com.
2 IN PTR client1.sandeepc.com.
3 IN PTR client2.

:wq save and exit

###########################################################################################################

####Now need to change the ownership of these zone files to named group####
####Before changing ownership snap####


[root@FREEDOM-WEB named]# ls -ltr
total 104
drwxrwx--- 2 named named 4096 Jul 27 2004 slaves
drwxrwx--- 2 named named 4096 Aug 25 2004 data
-rw-r----- 1 root named 427 Jan 16 2007 named.zero
-rw-r----- 1 root named 426 Jan 16 2007 named.local
-rw-r----- 1 root named 424 Jan 16 2007 named.ip6.local
-rw-r----- 1 root named 2518 Jan 16 2007 named.ca
-rw-r----- 1 root named 427 Jan 16 2007 named.broadcast
-rw-r----- 1 root named 198 Jan 16 2007 localdomain.zone
-rw-r----- 1 root named 167 Aug 9 03:26 localhost.zone.rpmorig
-rw-r----- 1 root root 195 Aug 9 04:01 localhost.zone.backup
-rw-r----- 1 root root 167 Aug 9 04:02 localhost.zone
-rw-r----- 1 root root 273 Aug 9 04:11 sandeepc.com.zone -------> its showing root group
-rw-r----- 1 root root 519 Aug 9 04:20 1.168.192.in-addr.arpa.zone ------> its showing root group
[root@FREEDOM-WEB named]#


####After changing ownership snap####

[root@FREEDOM-WEB named]# ls -ltr
total 104
drwxrwx--- 2 named named 4096 Jul 27 2004 slaves
drwxrwx--- 2 named named 4096 Aug 25 2004 data
-rw-r----- 1 root named 427 Jan 16 2007 named.zero
-rw-r----- 1 root named 426 Jan 16 2007 named.local
-rw-r----- 1 root named 424 Jan 16 2007 named.ip6.local
-rw-r----- 1 root named 2518 Jan 16 2007 named.ca
-rw-r----- 1 root named 427 Jan 16 2007 named.broadcast
-rw-r----- 1 root named 198 Jan 16 2007 localdomain.zone
-rw-r----- 1 root named 167 Aug 9 03:26 localhost.zone.rpmorig
-rw-r----- 1 root root 195 Aug 9 04:01 localhost.zone.backup
-rw-r----- 1 root root 167 Aug 9 04:02 localhost.zone
-rw-r----- 1 root named 273 Aug 9 04:11 sandeepc.com.zone ---------> changed group with named
-rw-r----- 1 root named 519 Aug 9 04:20 1.168.192.in-addr.arpa.zone --------> changed group with named
[root@FREEDOM-WEB named]#

### Now try to start and restart the service ###

[root@FREEDOM-WEB named]# service named start
Starting named: [ OK ]
[root@FREEDOM-WEB named]# service named restart
Stopping named: [ OK ]
Starting named: [ OK ]
[root@FREEDOM-WEB named]#


#### If service restart without any error means you have successfully configured DNS server ######

root@freedom-web named]# host 192.168.1.1
1.1.168.192.in-addr.arpa domain name pointer freedom-web.sandeepc.com.
[root@freedom-web named]# host freedom-web.sandeepc.com
freedom-web.sandeepc.com has address 192.168.1.1
[root@freedom-web named]#

#### Now check with windows machine (Within Network Machine) ####
GO TO RUN --> CMD --> nslooup
nslookup
Default Server: freedom-web.sandeepc.com
Address: 192.168.1.1

#### WE CAN CHECK WITH BROWSER ALSO, FOR THIS WE HAVE TO START HTTPD SERVICE####

In Browser (Server It Self)
http://192.168.4.1 (Apache Test Page Should Open)
http://freedom-web.sandeepc.com (Apache Test Page Should Open)

Client Side need to open means, you must need to put DNS as 192.168.1.1 in IP Address (If IP is static), If IP getting from DHCP server then add this DNS IP in DHCP server so it will get automatically...

Thanks and Regards,
Sandeep CC

Monday, July 16, 2012

NAT CONFIGURATION ON REDHAT LINUX-5


REQUIREMENT:

1. Red Hat (LINUX OS) Installed Machine
2. 2 Eth Cards
3. Internet Connection
4. Local Area Network
5. IPTABLES Installed

"HARDWARE CONNECTIONS"

ISP PROVIDED CONNECTION --> MODEM --> DIRECT LINE TO LINUX MACHINE eth0 & LINUX MACHINE eth1 CONNECT TO SWITCH --> SWITCH CONNECTED TO LAN"

SERVER & NETWORK DETAILS:

eth0 = Public IP (INTERNET) (WAN)
eth1 = Private IP (INTRANET) (LAN)
PUBLIC IP: 192.168.1.1 (Example IP)
LOCAL IP: 192.168.4.1

STEPS TO NATING:

STEP-1. CONFIRM 2 NETWORK CARD's ARE INSTALLED PROPERLY: (O/P Should 2)

[root@router ~]# ls /etc/sysconfig/network-scripts/ifcfg-eth* | wc -l
2
[root@router ~]#

STEP-2. ASSIGN IP ADDRESS SUBNET & GATEWAY TO eth0 & eth1 CARDS

eth0 (PUBLIC IP...ALL DETAILS PROVIDED BY ISP)

[root@router ~]# cat /etc/sysconfig/network-scripts/ifcfg-eth0
DEVICE=eth0
ONBOOT=yes
HWADDR=xx:xx:xx:xx:xx:xx
TYPE=Ethernet
USERCTL=no
IPV6INIT=no
PEERDNS=yes
NETMASK=255.255.255.252 ----> SUBNET MAST PROVIDED BY IPS
IPADDR=192.168.1.1 ---> IP PROVIDED BY ISP
GATEWAY=192.168.1.2 ---> GATEWAY PROVIDED BY IPS
[root@router ~]#

eth1 (PRIVATE IP...ALL YOUR LAN DETAILS)

[root@router ~]# cat /etc/sysconfig/network-scripts/ifcfg-eth1
DEVICE=eth1
BOOTPROTO=none
HWADDR=xx:xx:xx:xx:xx:xx
ONBOOT=yes
TYPE=Ethernet
#USERCTL=no
#IPV6INIT=no
#PEERDNS=yes
NETMASK=255.255.255.0 ---> LOCAL AREA NETWORK SUBNET MASK
IPADDR=192.168.4.1 ---> LOCAL AREA NETWORK IP
NETWORK=192.168.4.0 ---> LOCAL AREA NETWORK
[root@router ~]#

STEP-3 /ETC/HOSTS FILE MODIFICATIONS

[root@router ~]# cat /etc/hosts
# Do not remove the following line, or various programs
# that require network functionality will fail.
127.0.0.1 nat localhost.localdomain localhost
::1 localhost6.localdomain6 localhost6
[root@router ~]#

STEP-4 GATEWAY CONFIGURATION (ISP PROVIDE G/W)

[root@router ~]# cat /etc/sysconfig/network
NETWORKING=yes
NETWORKING_IPV6=yes
HOSTNAME=LINUX-NAT
GATEWAY=192.168.1.2 ---> ISP PROVIDED GATEWAY
[root@router ~]#

STEP-5 DNS SETUP (IPS PROVIDED DNS)

[root@router ~]# cat /etc/resolv.conf
nameserver xxx.xxx.xxx.xxx ---> ISP PROVIDED PRIMARY DNS
nameserver xxx.xxx.xxx.xxx ---> ISP PROVIDED SECONDARY DNS
[root@router ~]#

STEP-6 IPTABLEs (NATING RULES WITH IPTABLES)

"Flush all the rules in filter and nat tables"

[root@router ~]# iptables --flush

[root@router ~]# iptables --table nat --flush

[root@router ~]# iptables --delete-chain

"Delete all nat chains"

[root@router ~]# iptables --table nat --delete-chain

"DO IP FORWARDing and Masquerading"

[root@router ~]# iptables --table nat --append POSTROUTING --out-interface eth0 -j MASQUERADE

[root@router ~]# iptables --append FORWARD --in-interface eth1 -j ACCEPT

"Enable IP FORWARDING (1= Enable , 2=Disable)"

[root@router ~]# echo 1 > /proc/sys/net/ipv4/ip_forward

STEP-7 SAVE THE IPTABLES RULES and RESTART IPTABLES SERVICE

[root@router ~]# service iptables save

[root@router ~]# service iptables restart

STEP-8 "TESTING (SAME NAT MACHINE OR CLIENT MACHINE)"

1st Check Both IP's Pinging each other & Internet is coming in NAT Machine.

2nd Check Both IP's Pinging from Client Machine Note: CLIENT MACHINE SHOULD BE IN SAME LAN, AND GIVE G/W OF LINUX MACHINE IP 192.168.4.1

"PING WITH LOCAL eth1 IP"

ping 192.168.4.1

"PING WITH PUBLIC eth0 IP"

ping 192.168.1.1

"PING WITH WWW.GOOGLE.COM"

ping www.google.com

"NOW TRY TO BROWSE ANY WEBSITE" "IF NOT OPENING THEN ANY WEBSITE THEN CHECK WITH INTERNET PROPERTIES --> CONNECTIONS --> LAN SETTING --> PROXY SETTING --> PROXY SETTING SHOULD BE DISABLE (UNCHECK IF IT HAS CHECKED)AND NOW TRY TO BROWSE"


Thanks and Regards,
Sandeep CC

Tuesday, February 14, 2012

Configure Of Nagios Monitoring tool in REDHAT LINUX-5


This Nagios Monitoring tools i have install and configured in my Office, and this article will support you to install and configure Nagios monitoring tool in Redhat Linux, Follow the simple steps which given below.

Server: sandeeplinux-server (192.168.4.1 Local Network IP & Connected to Internet)

Requirement Servers & Services:

1. Apache Click Here For Installation Steps
2. PHP Click Here For Installation Steps
3. GD [Install GD rpm -i (RPM_NAME)]
4. GCC [Install GCC rpm -i (RPM_NAME)]

Start HTTPD Service
[root@sandeeplinux-server ~]# service httpd start
Starting httpd:
[root@sandeeplinux-server ~]#

Above 4 services/server must need to install/configure then turn to Next

Download latest Nagios & Nagios-Plugins (I have experienced with below versions

Click Here To Download Nagios nagios-3.3.1.tar.gz
OR In CMD MODE

[root@sandeeplinux-server]# wget http://sourceforge.net/projects/nagios/files/nagios-3.x/nagios-3.3.1/nagios-3.3.1.tar.gz/download

Click Here To Download Nagios-Plugins nagios-plugins-1.4.15.tar.gz
OR In CMD MODE

[root@sandeeplinux-server]# wget http://sourceforge.net/projects/nagiosplug/files/nagiosplug/1.4.15/nagios-plugins-1.4.15.tar.gz/download

Unzip Folders

[root@sandeeplinux-server Server]# tar -xzf nagios-3.3.1.tar.gz
[root@sandeeplinux-server Server]#
[root@sandeeplinux-server Server]# tar -xzf nagios-plugins-1.4.15.tar.gz
[root@sandeeplinux-server Server]#

Create Nagios User and Password, and add to Apache Group

[root@sandeeplinux-server ~]# useradd nagios
[root@sandeeplinux-server ~]# passwd nagios
Changing password for user nagios.
New UNIX password:
BAD PASSWORD: it is based on a dictionary word
Retype new UNIX password:
passwd: all authentication tokens updated successfully.
[root@sandeeplinux-server ~]#

[root@sandeeplinux-server ~]# usermod -a -G nagios apache
[root@sandeeplinux-server ~]#

Configuration Of Nagios

[root@sandeeplinux-server]# cd nagios
[root@sandeeplinux-server nagios]# ./configure
[root@sandeeplinux-server nagios]#
[root@sandeeplinux-server nagios]# make all
[root@sandeeplinux-server nagios]#
[root@sandeeplinux-server nagios]# make install
[root@sandeeplinux-server nagios]#
[root@sandeeplinux-server nagios]# make install-init
[root@sandeeplinux-server nagios]#
[root@sandeeplinux-server nagios]# make install-config
[root@sandeeplinux-server nagios]#
[root@sandeeplinux-server nagios]# make install-commandmode
[root@sandeeplinux-server nagios]#
[root@sandeeplinux-server nagios]# make install-webconf
[root@sandeeplinux-server nagios]#

Creating Admin Account For Nagios Login

[root@sandeeplinux-server nagios]# htpasswd -c /usr/local/nagios/etc/htpasswd.users nagiosadmin
new password (Give Password For Nagios Login User)
[root@sandeeplinux-server nagios]#

Restart HTTPD Service:

[root@sandeeplinux-server ~]# service httpd restart
Stopping httpd: [ OK ]
Starting httpd: [ OK ]
[root@sandeeplinux-server ~]#

Configuration Of Nagios-Plugins

[root@sandeeplinux-server]# cd nagios-plugins-1.4.15
[root@sandeeplinux-server nagios-plugins-1.4.15]# ./configure
[root@sandeeplinux-server nagios-plugins-1.4.15]#
[root@sandeeplinux-server nagios-plugins-1.4.15]# make
[root@sandeeplinux-server nagios-plugins-1.4.15]#
[root@sandeeplinux-server nagios-plugins-1.4.15]# make install
[root@sandeeplinux-server nagios-plugins-1.4.15]#

Create Entry For Nagios in /etc/init.d/:

[root@sandeeplinux-server nagios-plugins-1.4.15]# chkconfig --add nagios
[root@sandeeplinux-server nagios-plugins-1.4.15]#
[root@sandeeplinux-server nagios-plugins-1.4.15]# chkconfig nagios on
[root@sandeeplinux-server nagios-plugins-1.4.15]#

Check Configured configuration's are correct with 0 errors:

[root@sandeeplinux-server ~]# /usr/local/nagios/bin/nagios -v /usr/local/nagios/etc/nagios.cfg
Total Warnings: 0
Total Errors: 0


Things look okay - No serious problems were detected during the pre-flight check
[root@sandeeplinux-server ~]#

Start Nagios Service (If It Is 0 Error then only start service)

[root@sandeeplinux-server ~]# service nagios start
Starting nagios: done.
[root@sandeeplinux-server ~]# service nagios status
nagios (pid 17436) is running...
[root@sandeeplinux-server ~]#

Now Login With Nagios In Browser

Login In Local System
Open Your Browser In Local System http://localhost/nagios
User Name: nagiosadmin
Password: nagiosadmin

Login In Remote System

Open Your Browser In Remote System http://192.168.4.1/nagios
User Name: nagiosadmin
Password: nagiosadmin

Now You will Get Nagios Home Page:


Technical Overview


Hosts


Services


Thanks & Regards,
Sandeep CC